Management accounting presented inunderstandablehumanaccessiblelanguage.
Management accounting presented inhumanaccessiblelanguage.
The easiest and the most required table in the business industry will be overviewed in this article. That is the operation plan for payments.
The table itself can be of different sizes and types. Moreover, each company can make its table, which will match their needs. Now I will describe a variant of the table for the operation plan for the month.
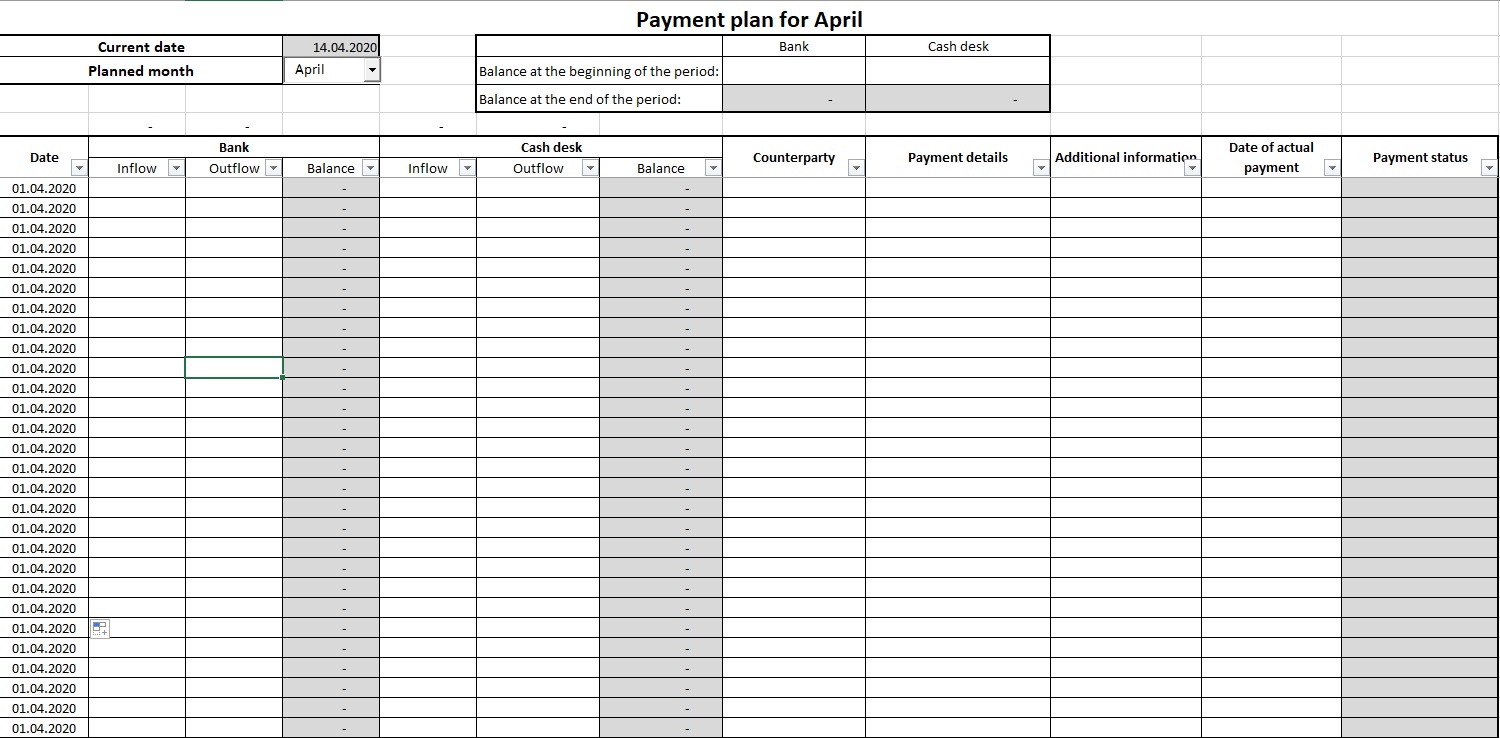
Operation plan for the month
Let’s overview it in detail.
Line 2 “Current date” – this table automatically updates the current date in table cell D2.
Line 3 “Planned month” – you can select the planning month here, in table cell D3.
The cash balance table – you indicate the balances of the bank and cash desk at the beginning of the planning period in line 3. The balance at the end of the period is calculated automatically. It is colored in red if the balance is less than zero.
Now we turn on to the main table.
Column A “Date” – the date of payment is indicated here. Originally, the column automatically shows the first date of the planned month. In the process of month planning, you need to indicate required dates on top of the formula in the table cell. All cells below corrected one will show the date you have already specified. Exception: cell A8. The date cannot be changed here.
Columns B, C, D – you write here the amount of the expected income, expenses and automatically get the balance of the current account.
Columns E, F, G – you write here the amount of the expected income, expenses and automatically receive the cash balance.
Column H – the counterparty is indicated here.
Column I – you describe here the purpose of the payment. For example, “For stationery.”
Column J – write here additional information, if it is necessary. For example, the contact person of the counterparty.
Column K “Date of actual payment” – here you need to indicate the date when the operation was made. That is an important column, and if you do not fill it in, the file hints will not work correctly and you will be confused by the file.
Column L “Payment status” – the status of the planned operation is automatically indicated. Depending on the data in this column, the corresponding line is colored either in red or in green.
Example of filling
Table 2
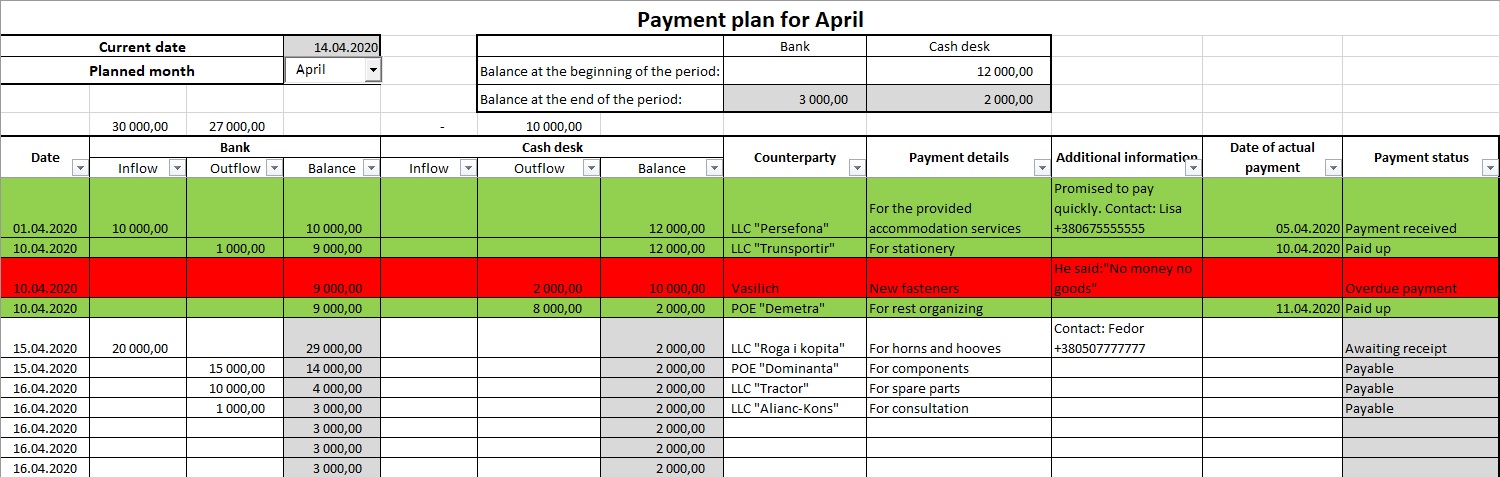
I scheduled payments in April with the operation plan template shown in Table 1. First of all, I selected the month in table cell D3. After that, the table heading changes to the current one, and all data in the column “Date” takes on the value 01/04/20. Then, I plan payments. Moreover, at the time of planning, for income transactions was the status “Awaiting receipt” and for expenses transactions “Payable.”
The current date changes in table cell D2 and status of the payment changes accordingly in the process of fulfillment of the April plan. Pay attention to line 10. That payment was not made as planned on 10/04/20 and, therefore, there is no date in the column “Date of actual payment,” and the current date (table cell D2) is already 14/04/20. That is why the payment status automatically changes to “Overdue payment” and this line turns in red.
There are dates of actual payments for all fulfilled transactions and they should be entered in the appropriate column. When you set the date of the actual payment, the transaction receives the status “Paid up” or “Payment received” and is automatically colored in green.
If the amount of planned payments exceeds the balance of funds in the cash register or on the current account, then table cells I4 and H4 will turn in red.
In addition to that, look at line 5. Table cells B5, C5, E5, F5 contain a formula that automatically calculates the amount in the column below for the filtered lines. You can filter using the auto filter set in line 7. For example, in the column “Payment status” you can select only those payments that are overdue or only those that have been paid up. The above table cells will calculate only the selected amounts according to the filter. It is also possible to filter according to the color of the table cells.
When you need to prepare a file for the next month, it is enough to delete the data from the columns B, C, E, F, H, I, G, K in the main table, and change bank and cash desk balances at the beginning of the new period in the table cells H3 and I3.
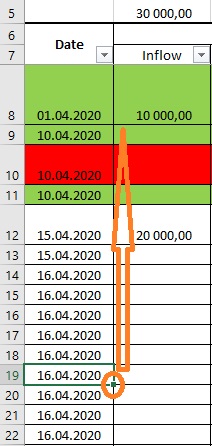
You also need to control the column A “Date.” While scheduling the previous month, you changed dates in many columns over formulas. To return the dates to their original condition, you should:
Table 3
After that, this file is ready to use again.
Preparing a file for a new month, do not change anything in the name, just change the month in the table cell D3 and the name will be changed to the actual one automatically.
Pay attention, this file was made in Excel 2016. In older versions of this program, some of the conditional formatting functions may not work and the lines in the table may not be colored on your device.
You can view another version of the operational plan here.
